

Showing posts with label Tricks. Show all posts
Showing posts with label Tricks. Show all posts
 You may have faced a situation that when you open adobe photosohp it crashs after Reading Preferences
I ill tech you how to fix it with eaze
Go to My Computer
Click Organise

Click Folder And Search Option
Click View Tab
Select Option Show Hidden Files & Folders
Click Apply
Select Option Show Hidden Files & Folders
Click Apply
Then go to the bellow location
Windows-7 |
C:\Users\Username\AppData\Roaming\Adobe\Photoshop\Version\Adobe Photoshop CS Settings |
*Replace Username with your username Version with your Version, C:\ with your Root Drive
Delete all files found in the folder Adobe Photoshop CS Settings

Now open Photoshop and it will not crash again
 It’s a simple trick to amaze your friends.When you Log On infront of them.
Yeah a trick to make your Computer Welcome you on Start Up.
Lets Do It:
Open Notepad
Paste the bellow code in Np
Dim speaks, speech speaks="Welcome Back, Username" Set speech=CreateObject("sapi.spvoice") speech.Speak speaks |
Replace Username with your Name
Click Save As and save as type Welcome.vbs
Copy File Welcome.vbs and paste it in bellow address
Windows-7 |
C:\Users\Username\AppData\Roaming\Microsoft\Windows\Start Menu\Programs\Startup |
*Replace Username with your username and C:\ with your Root Drive
Windows-Xp |
C:\Documents and Settings\All Users\Start Menu\Programs\Startup |
Done Log Off and Log In Amazed? .Now Your computer welcomes you
You will find 10 awsome fonts underneath
SF Fourche

Star Avenue

Aaunchanted Expanded

Just Old Fashion

Dekers

Black Out

Oceania Bold

Brown Wood

Advent

PlagueDeath


I have searched many sites for Downloading Youtube Videos Online.And found than many of them are scams, As the require additional plugins and some others requires survey completion.
So today I am updating a site in which user can download Youtube videos free with out any plugins
Lets start
Copy the video Link(Url) from youtube eg: http://www.youtube.com/watch?v=XXXXXXX
Go to Videograb
Paste The Url(Link) in the text box
Enter Image Verification Code(Captcha)
Click Download Button
And the download link is ready bellow to Download
To Play Flv(Flash Video) you require Flv player
I personaly recommend Gom Player
Download Gom Player
Download Codec
What is Google Authorship Markup
By Google authorship markup, Google may display the author information into search to help users discover the great content, for example, check the query: [strikethrough text in google plus]. If you want to display your author information into Google search, you'll need a Google+ Profile which having good quality profile picture, which display your headshot clearly. There are two ways to verify your authorship of your content you can check it by going to Author information in search result, but none of these method works for blogger blogs. If your blog is hosted on blogger, then follow the below steps to verify your author information in Google search and wait for some weak. (In my case, our authorship approved within 3 days. Best luck for you!)
Verify Google Authorship Markup-Blogger | Show/Display Author Photo into Google Search
- Now go back to your blogger and --> Sign in to your blogger dashboard :

--> Click on Template under more options ::

-- > Click on Edit HTML ::

-- > Now proceed to editing and [Don't forget to backup your template] Check box in " Expand Widget Templates " and find the code (using ctrl+F) <head> and paste the below code, below <head>,
<link href='YOUR GOOGLE PLUS PROFILE URL' rel='author'/>
make sure to replace your YOUR GOOGLE PLUS PROFILE URL with your Google plus profile URL in the above code. Take a preview,

- Skip this step, if you have already created your about me page. Otherwise, create your about me as static page into your blogger. In this page, you should be clearly write about you and your blog.
- Link all post to your about me page. As you can see in my blog, at the top navigation bar, you'll see an About us link, which is fixed for every page, means all my pages are linked with our about us page. You can do it by adding your about me page link to your navigation bar or sidebar or footer. Make sure, your about me page link must be appeared on your every post.
- Inside your about me page, you must be add a clickable link as your Google+ profile URL with rel="me" property. You can see in my about us page. We have added our Google+ profile like below,
<a href="https://plus.google.com/117108331713828988818" rel="me">Google+</a>
Make sure to replace Google+ profile URL with your own in the above code. - Now, create a clickable link as your Google+ profile URL with rel="me" into every page of your blogger. You can do it by adding your Google+ profile URL to navigation bar, sidebar or footer. For example, we have added Google+ profile link, +Mohammad, into fourth column of footer widget. Now, if you done all the steps mentioned above, then the work on blogger has been completed.
- Go back to your Google+ Account and go to your profile by clicking here on Google+ profile page. Now, click on Edit Profile, see a preview:

mouse hover on Other profiles and click on it. Now, click on Add custom link, take a preview:

link your about us page and select Public and finally, Save it.
Now, mouse hove on Contributor to and add your blog home page link. When you finished it. Finally, click on Done editing on the header.
Now, wait for some days even weeks. Hope, you'll get your author picture into Google search soon. If you have any problem to complete any step, you could notify me by comment here. I'll respond you as soon as possible.
Original Source :www.bloggertipsseotricks.com
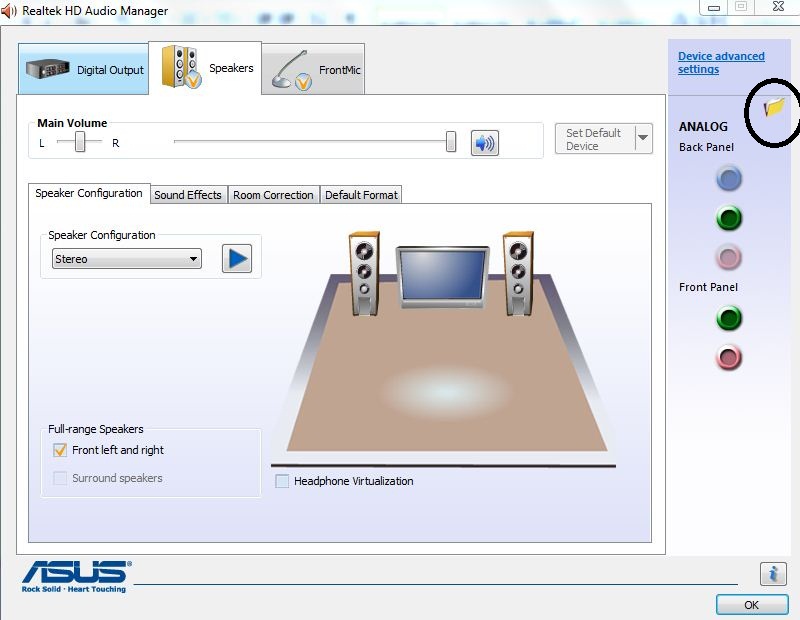
If you have a RealTek Driver
- Go to your Control Panel
- Click HardWare And Sound(* For Windows-7)
- Click on “Realtek HD Audio Manager”.
- When window opens, in the top right hand corner there should be a Folder Icon
- Click to open it,
- In Connector Settings Window. Un-Check “Disable front panel jack detection”
Then use ur front panel for HeadSet
Posted By Rashin (@dmin)
Yes now adays your network operator may cheat u by charging u additional bills
So by installing a Internet Usage Meter in ur computer you can calculate how much data u use
First Download Internet Usage Meter
Click Install
Select Ur Network Connection From The List

Click Ok
Now u have installed the Internet Usage Meter
It will be showing the Reading on Right Top of ur DeskTop

Thanks To http://rackeys.com

Yes normal sites charge more than $35 for Back Links
Back Links increases ur Link Popularity and ur sites have high ranking on Search Engines
Back Links are exactly Link Back to ur site and thus increases ur website traffic
So I am giving you free 1000+ backlinks
Register bellow
If U Are Interested Read My Post On Facebook Hacking

Yes you can use ur Keyboard as a Mouse when ur mouse is down or Emergency
Press Shift+Alt+Numlock from ur Keyboard
Press Yes on the window appearing on the screen

Now you will see a Mouse icon in Task Bar

Now you can use your keyboard as mouse
Navigation Keys (Num Lock Keys)
8 – Up
2 – Down
4 – Left
6 – Right
7,9,3,1 – Directional Navigation
Note:You Must Turn On Num Lock
If U Are Interested Read My Post On Facebook Hacking

Works to be done by you:
- · Read Bonus E- Mails
- Complete Offers
- Reffer Friends
- Take Part In Quiz’s (Free 150 Rc For Every Lucky Winner Daily)
Main advantage of this site is that It Has No Min Recharge Amount ie U can start ur recharge from Rs.10
And up to u earn.!
Register Here
If U Are Interested Read My Post On Money Making
If U Are Interested Read My Post On Money Making
Go To Start Menu in Search Box enter Change Keyboards Or Other Input Methods

Select It
Click On Keyboard And Languages
Change Keyboards

Under General Tab click Add Button
From Dropdown List select Ur Language click Ok

Click Language Bar on Top
Put Option Docked In Task Bar
Also Check other 3 Options

Check your Task bar For Your Language Tab
Select Ur Language


